
Inside the Toolbox: Using Annie Sloan's Flat Brushes for Smooth Finishes
Why we love using Annie Sloan's Flat Brushes for smooth painted finishes.
Hello in the new year! For our first blog post of 2017, we wanted to jump right in and talk about smooth, sleek painted finishes. These are the quintessential contemporary, modern, and even Mid-century Modern finishes that are not only popular at the moment but timeless. As you know, Chalk Paint® by Annie Sloan is versatile for both smooth and rustic techniques. How do we achieve such looks though?
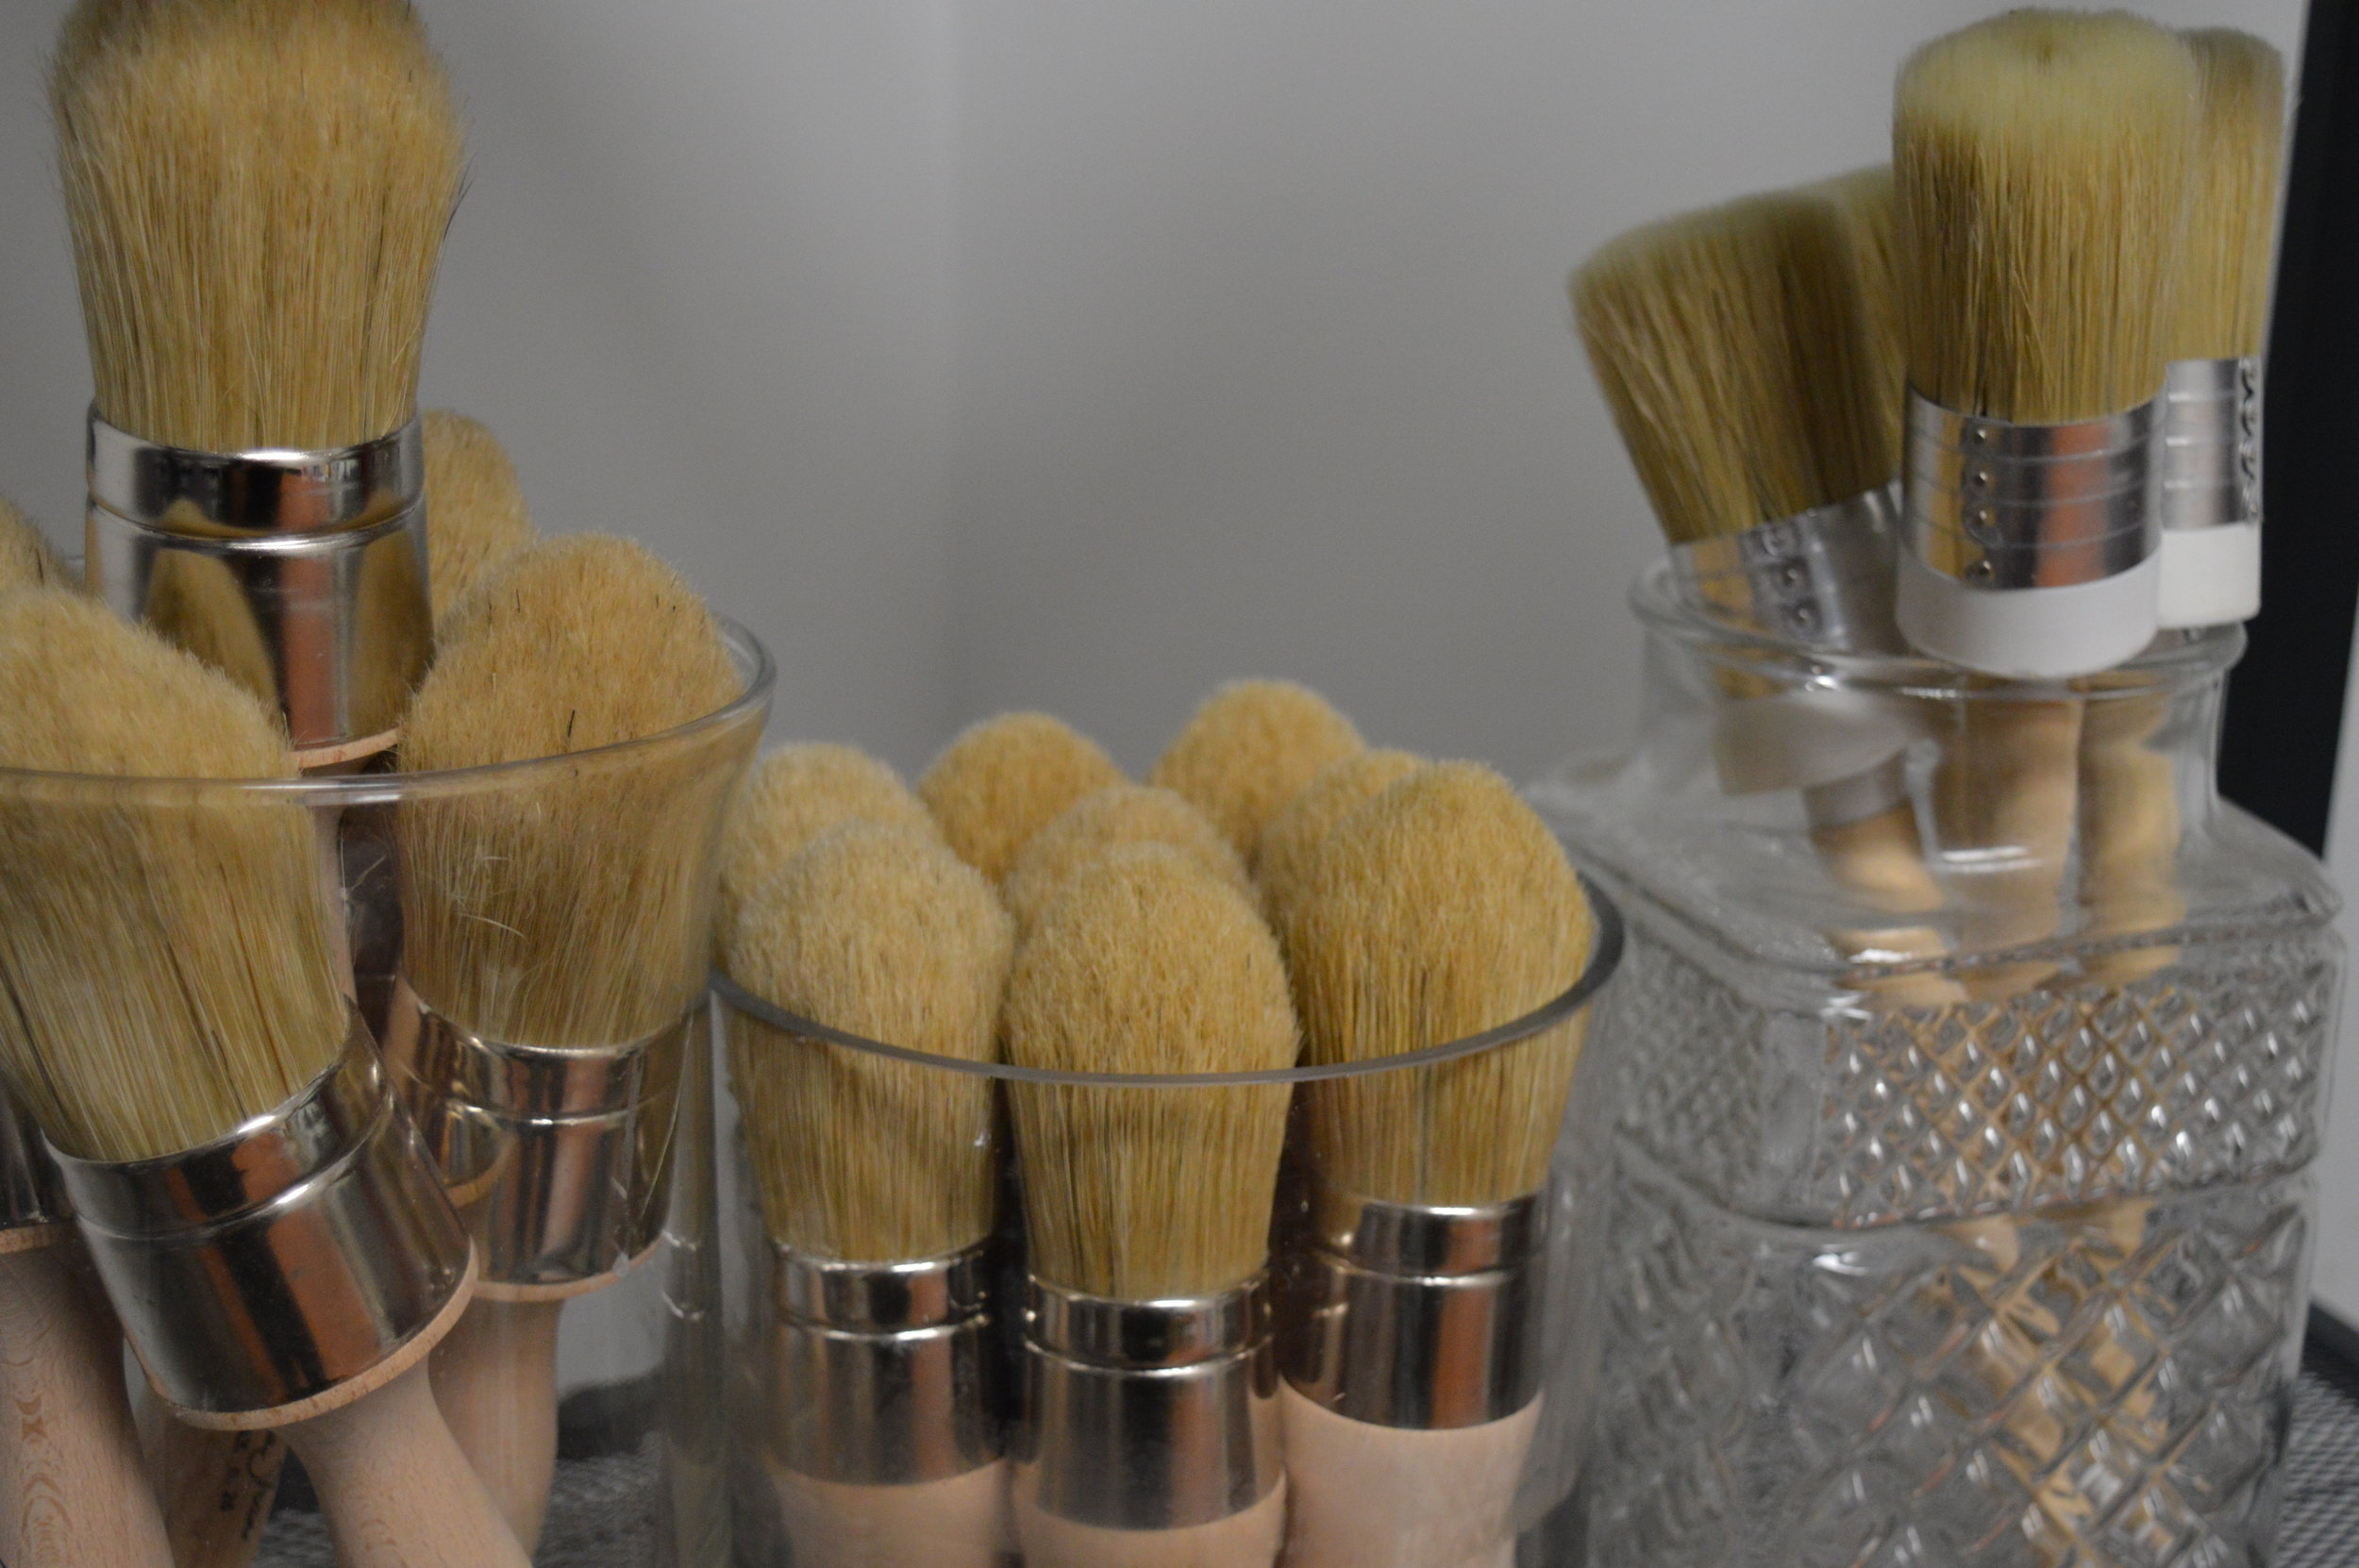
Since Chalk Paint® decorative paint is a bit thicker than other types of paint, achieving specific finishes can come down to the type of brush. Chalk Paint® is already relatively self-leveling (especially once a layer of Soft Wax is applied), so it's not difficult to use your brush for smooth finishes. To minimize the look of brush strokes, use Annie Sloan's Flat Brushes. As high-quality synthetic brushes, they've been made to specifically work well with her paint line. When painting, work the brush from one side to the next of each section of your piece, working 'with the grain.' Each layer of paint should be thin and allowed to dry thoroughly before the next. Adding a tiny bit of water in with your paint can also help spread each stroke nicely, with minimized appearance. Anytime you feel the need to slightly sand, don't hesitate! See our video below:
The Flat brushes come in two sizes, giving greater accessibility for different sized surfaces. The small size is thin and narrow, and perfect for trim and other small spaces. They're easy to clean with soap and water. We always stock both sizes in our brick & mortar shop and online.
*You may have also seen painting techniques where brushstrokes are painted haphazardly, in an almost cross-hatched effect. This is a technique that Annie Sloan displays well, which fools the eye into thinking the surface looks flat and even due to optical confusion. Try your hand with that using the Flat Brushes if you'd like as well!
Happy Painting xo.

*GIVEAWAY!* October 2016
Enter our Giveaway by signing up to our email list.
If you're not already on our email list get on it ASAP, because we're doing a Giveaway for one lucky person on the list!
On Friday October 21st, we'll select our winner- and they'll receive one copy of Flea Market Secrets by Geraldine James. This book is a flea market, thrift hunting, treasure BIBLE, with great tips and ideas for your creative search.
Sign up to our email list to be entered into our Giveaway (we also have links to it through our homepage). In addition to being considered for our Giveaway, signing up to our email list gets you our latest news, events and workshop calendar, promos, and MORE!
So enter away, and if you're already on our email list you're already eligible!
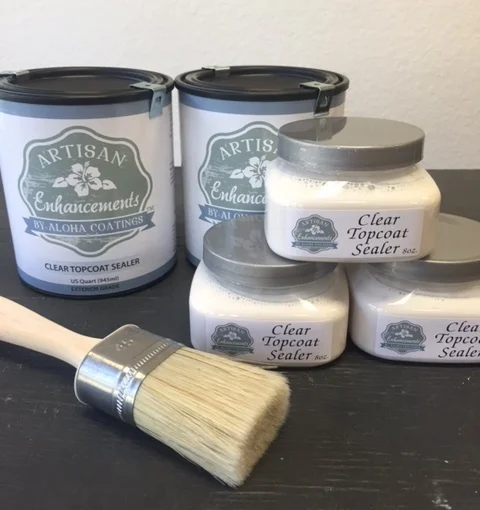
Applying Clear Topcoat Sealer
If you're not familiar with Clear Topcoat Sealer by Artisan Enhancements®, this blog post is for you! If you're familiar with it but need a bit of a tutorial on how to apply it properly, this blog post is also for you.
Clear Topcoat is a soya-based, non-toxic and No VOC penetrating liquid topcoat that is absorbed well by Chalk Paint® by Annie Sloan, Miss Mustard Seed's Milk Paint, and other water-based paints. It's both interior and exterior grade, and is the only sealer that can be applied to Annie Sloan's Chalk Paint® waxes (once they're cured and dried for 24 hours). It's applied over a completely dry painted surface with an ultra-smooth brush or roller, such as Artisan Enhancements®' Topcoat Brush, or a smooth synthetic-bristle brush. These tools are essential to help minimize brush strokes and help your topcoat look flawless.
Here are two videos I compiled, working with the Clear Topcoat Sealer over French Linen Chalk Paint®:
and some more tips about using the Topcoat Brush to apply the Sealer optimally:
To purchase any of these products, visit our online shop or stop by our shop location! We're always happy to provide a free in-person demo on how best to apply any of our topcoats.

Guest Blog Post- Color Blocking Organizing
A guest blog post by Sharon Munroe, featuring a collaborative project with her son.
Guest Blog By Sharon Munroe
Having begun painting furniture this summer I am looking at wood furniture in my home in a whole new way. My family has caught onto this trend and each of my three children wants a part in painting. I decided that I will work with each of them individually to plan and paint something old or new for their bedrooms.
First up, my eight-year old who I fondly call “the pack rat.” Since my son was about three years old he has been a maker and tinkerer. To satisfy his creative and builder instincts, he saves odds and ends. They end up everywhere, including in the corners of his small bedroom. My son also has an interest in art and color. He has had the opportunity to draw and paint since he was a toddler. His favorite activities lately are making comic book drawings and crochet. Since he was able to hold a pencil, I have him a sketch pad to use in his car seat.
We decided that our project together would be one focused on organization and color. I own an old-fashioned, shaker-style organizing unit that once sat on a kitchen counter. With my kitchen remodel some 10 years ago, the organizer was relegated to a closet where it collected dust. It turns out that the dark, wood stain on it matches the color of my son’s bedroom furniture. We could make the unit match his room’s decor easily. With the help of Katie at Silk and SageDesign Studio, I wanted to try something a bit different.
Katie and I discussed the project in person and how to achieve a look with multiple paint colors. I often visit during my lunch break at work. Silk and Sage is open from 11:00AM to 7:00PM Tuesday through Friday (plus weekend hours). Originally, we considered doing stripes of green and yellow paint to match the bedroom’s wall paint and another small dresser inside. By looking at the Annie Sloan Chalk Paint® Colour Card at home, my son and I had selected bright Antibes Green, just like his bedroom wall color and the sunny shade of English Yellow.
Once back in his room, the inspiration came to me. Color blocking this very rectangular piece would make it fun for a child’s room. Leaving part of the surface in the dark stain would make it look very customized to the existing dark furniture. The best part was that my son had done color blocking on a canvas in an art program a year earlier and that piece was already hung above the dresser and the new spot for the painted organizing unit.
He was excited to help with the project so I reviewed all of the steps with him and asked him to paint the larger flat surfaces, including the top and side of the unit plus one of the fronts of the drawers. With his apron on and a paintbrush in hand, he was happy to help.
How to Color Block in a Few Easy Steps:
1. Clean the entire surface you are going to paint with a damp, soft rag. Follow with a dry soft rag.
2. Mark off areas that are not getting painted with two layers of painter’s tape. Two layers means that the paint is less likely to run into the other surface.
3. Apply a coat of one color Annie Sloan Chalk Paint® throughout the piece.
- Alternating sections of color to the left/right or up/down makes it more visually interesting.
4. Apply a coat of the second color in your pattern. (Repeat if you have a large piece with a third or fourth color.) Let the first paint coat dry thoroughly.
5. If the original color of the wood is dark as mine was, apply a second coat of each paint color. It evens out the tone and provides full matte coverage.
6. Use a soft pure bristle brush to apply a coat of Annie Sloan’s Dark Soft Wax (looks brown) to the parts of the piece that you want to keep dark. This gave shine and new life to my piece.
7. Apply Annie Sloan’s Clear Soft Wax to give the newly painted areas an allover smooth surface.
8. Wipe off any extra with a soft shop towel, similar to a paper towel but thicker and without any lint. Let the furniture dry overnight.

Now see the painted and refinished organizing unit in my son’s bedroom, ready to be the new home of his favorite drawings, yarn and odds and ends.

Painting Over Metal
How to use Chalk Paint® by Annie Sloan to paint on metal, or other slick surfaces (such as glass)!
Have you ever tried to paint over metal or glass? Was it successful or unsuccessful? Pinterest and the rest of the blogosphere are saturated with photos of DIY painted mason jars and similar items, and if you're lucky you'll get an accompanying tutorial! But not always.
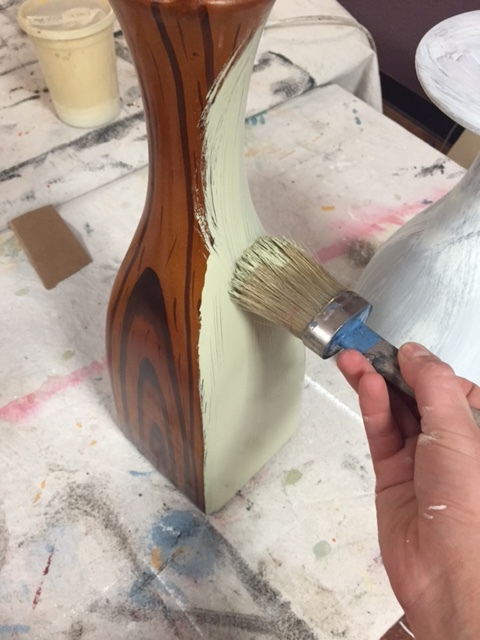
I've used Chalk Paint® to successfully paint over both metal and glass countless times- windows, jars, vases, cast iron furniture, you name it. However there are some key steps to achieving success! I painted these metal vases over the weekend and documented what I did. They had a not so fortunate (faux-tiger?) pattern on them to begin with, but they had great bones (great forms). Why not upcycle with these steps?
1. Step 1 of painting over any item, furniture or otherwise, is to clean it really well! I'm talking a damp cloth at the very least- soap and water or vinegar and water are preferable. If the item has any gunk, stickiness, or looks worse for ware, you can always clean with Krud Kutter or another similar biodegradable degreaser. ALWAYS make sure to wipe down with a damp cloth afterward to remove any potential lingering cleaner residue, and then let dry thoroughly.
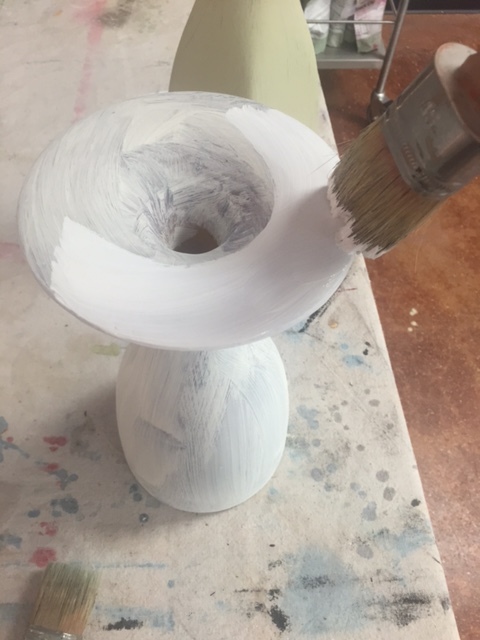
2. Once dry, start with your first coat of paint. Over metal (or glass) the first coat may look very brushy or streaky. Not to worry though! Your first coat of Chalk Paint® is basically a priming coat. When the paint sits over a slick surface, like metal or glass, it will need to sit on extra long before you add a second coat, so that it has time to really adhere to the surface. If possible, sanding your slick surface will also increase adherence. Here I chose Versailles and a first coat of Old White (though I followed up later with Pure White- I did a coat of the Old White first because it would block the dark pattern underneath better- true Pure Whites don't contain pigment and therefore are a little sheer).
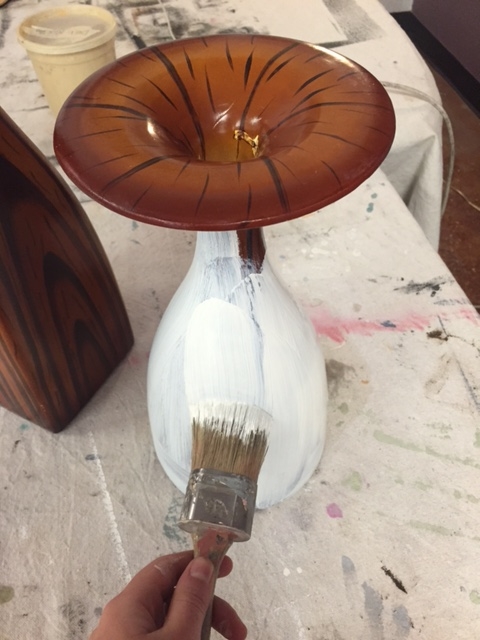
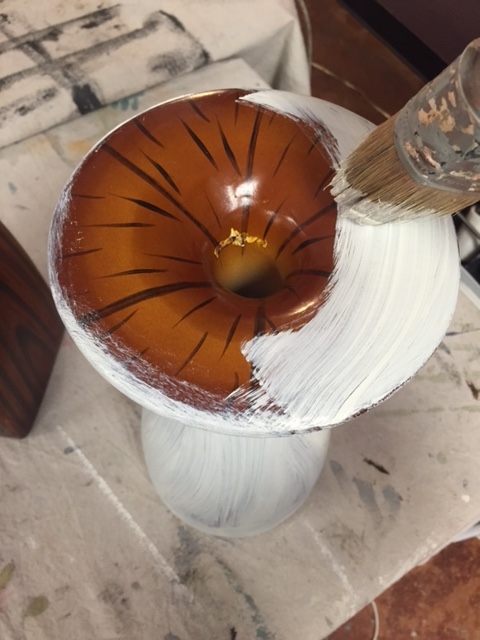
3. When I state that the first Chalk Paint® coat needs to sit on for extra long before the second, I mean let it sit undisturbed over night. Come back to it the next day and apply a second coat. For the vase I painted Versailles, the second coat was enough. However, since Pure White was a little sheer, I waited over night again before applying a third coat as well.
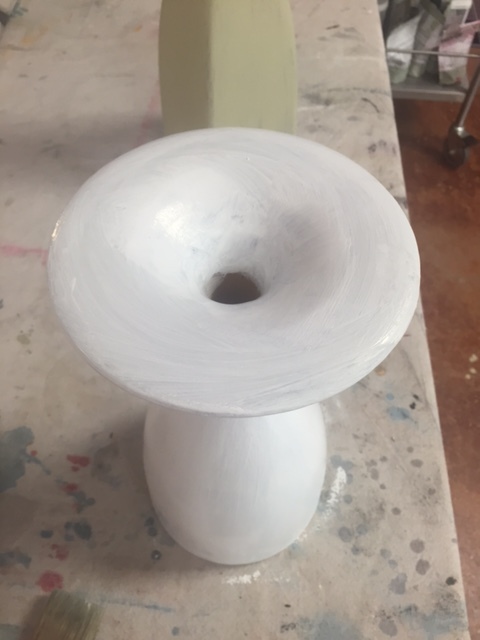
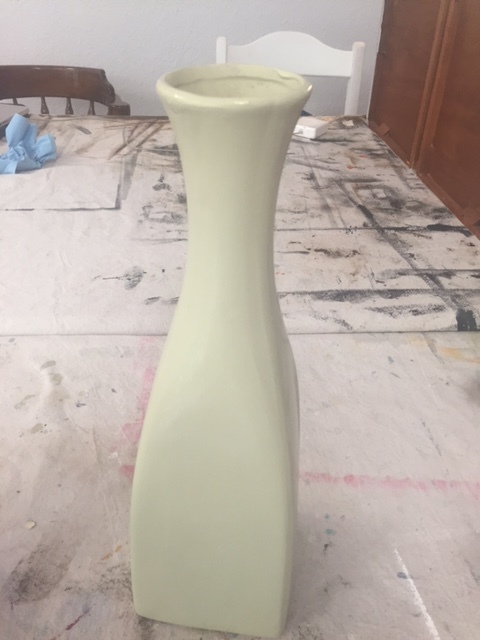
4. If leaving the paint as-is, you can go ahead and seal with Annie Sloan's Soft Waxes, or another compatible water-based sealer. If you wanted to distress, do a wash, or any other decorative technique, you'd do that before sealing. Let dry to the touch (24-48hrs) before using!
I didn't stop there though... I wanted to add a metallic pop to the bottom of each vase using gilding leaf. Gilding leaf is applied wherever you add gilding size, or the glue, and won't stick wherever there isn't the size. It brushes on very milky but dries clear and tacky. Once tacky, guide the gilding leaf on and press down using your fingers and a craft chip brush, pressing it down firmly. I chose imitation gold leaf for the Versailles vase, and copper leaf over the Pure White vase.


If you find that the gilding leaf gets stuck to your hands, dip your hands in corn starch and that will prevent this from happening. After you're satisfied with applying gilding leaf, rub your craft chip brush over the leaf to burnish it and remove excess metallic flakes!
You can seal the leaf with Annie's Soft Waxes too, but since I wanted to give someone the option to use these outdoors, I sealed with Clear Topcoat Sealer by Artisan Enhancements® because it is an exterior-grade sealer. It works well with Chalk Paint® by Annie Sloan. *Please Note: over Pure White, it can penetrate and bring up tones from underneath the paint- I did not mind this aspect here, but when using over Pure White on furniture or decor, you should seal prior to painting (seal with a coat of Clear Topcoat Sealer- it can be used as a clear priming coat that blocks stains, colors, odors, etc).
Brush the Clear Topcoat Sealer on with a very soft natural bristle or synthetic bristle brush- it can also be rolled with a foam roller. When applying, you're going to use the tiniest bit on your bristles. It should look clear and wet, not milky. If you notice you're applying too much, try to spread it over your surface as much as possible, keeping your brush moving from one spot to the next as to not over process the surface. Let dry overnight (24 hours recommended) before applying a second coat, or before using. If the surface is still tacky, it may be that there's too much product left on the surface. Just allow it to dry longer if this happens!
And there you have it! You can replicate this at home with any of the same materials. Stop by our online shop to look at Chalk Paint® by Annie Sloan, color choices, and sealer options!